Using Blackboard's Swagger File to Create a Postman Collection and Make an API Call
• Calculating...
This guide will help you import Blackboard Ultra's API into Postman, set up authentication, and make your first API request. It’s written for users who may be new to Postman or working with APIs.
🛠️ Prerequisites
Before you begin, make sure you have:
- A Blackboard Learn instance with REST API access enabled
- A registered application in the Anthology Developer Portal
- Postman installed (Download here)
- Credentials for the
client_credentialsgrant type (provided when registering your application)
🔁 Step 1: Download the Blackboard API Swagger File
-
Go to the Blackboard REST API documentation:
-
Under the Learn APIs section, right-click the link below and open it in a new tab (or, open the link below 🤪):
👉 https://devportal-docstore.s3.amazonaws.com/learn-swagger.json
-
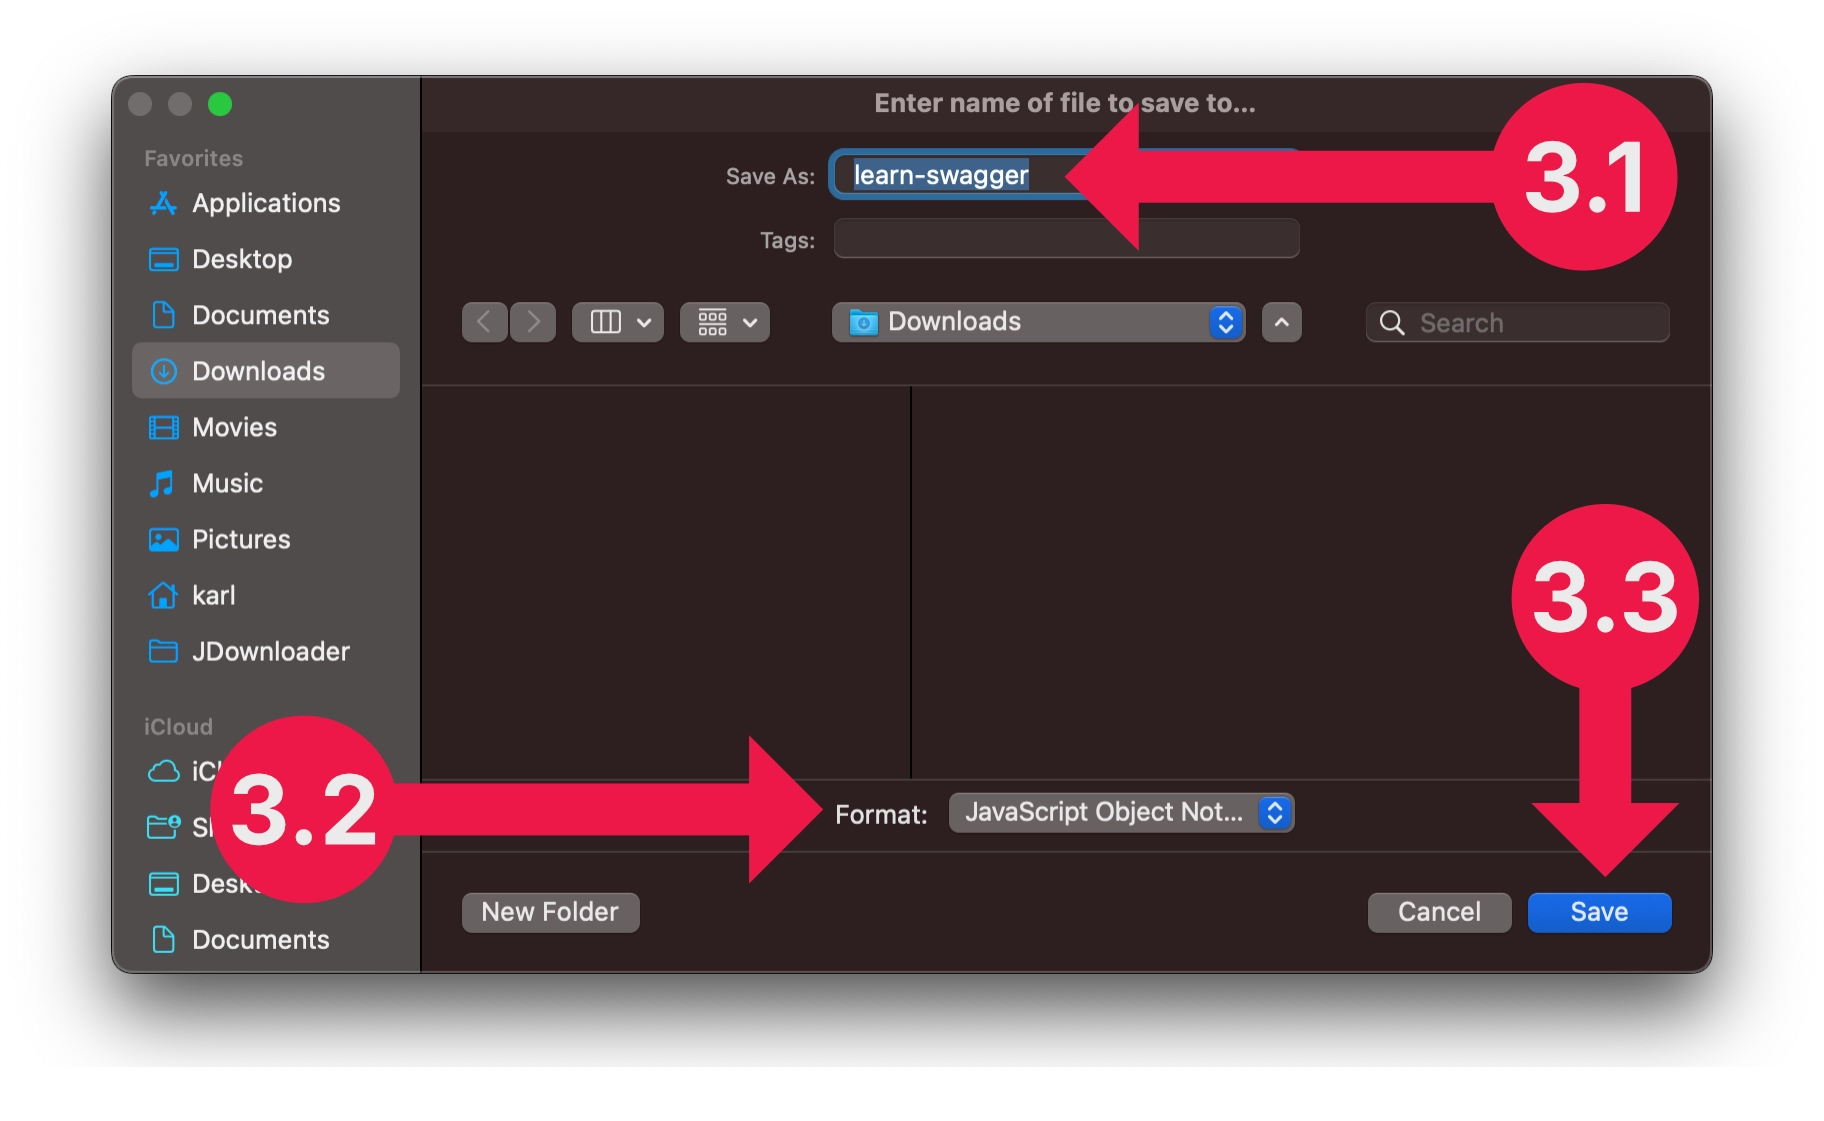
When prompted to save the file:
- Name the file
learn-swagger.json - Choose JavaScript Object Notation (.json) as the file type
- Click Save
- Name the file

- Alternatively, if your browser displays the file instead of downloading it, click Save, then follow step 3.
🧰 Step 2: Import the Swagger File into Postman
- Open Postman.
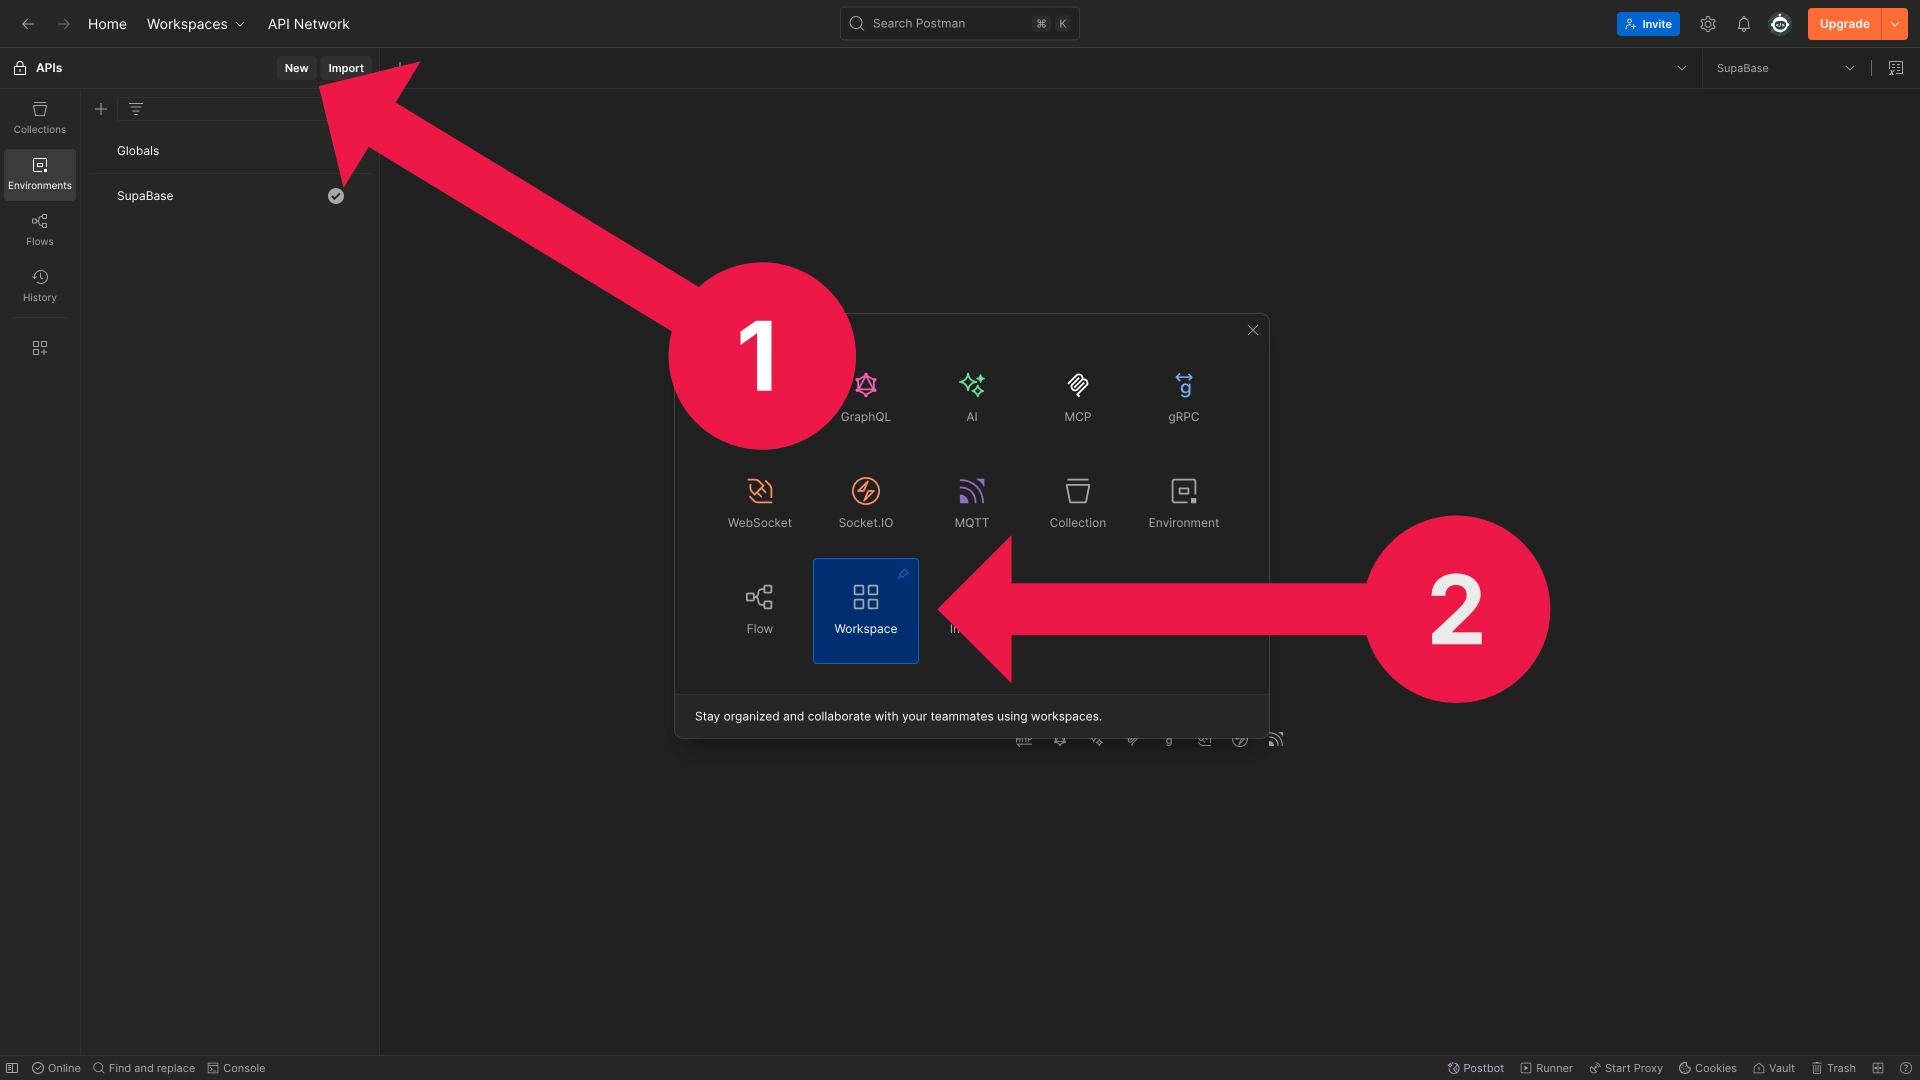
- From the top-left, click New > Workspace.
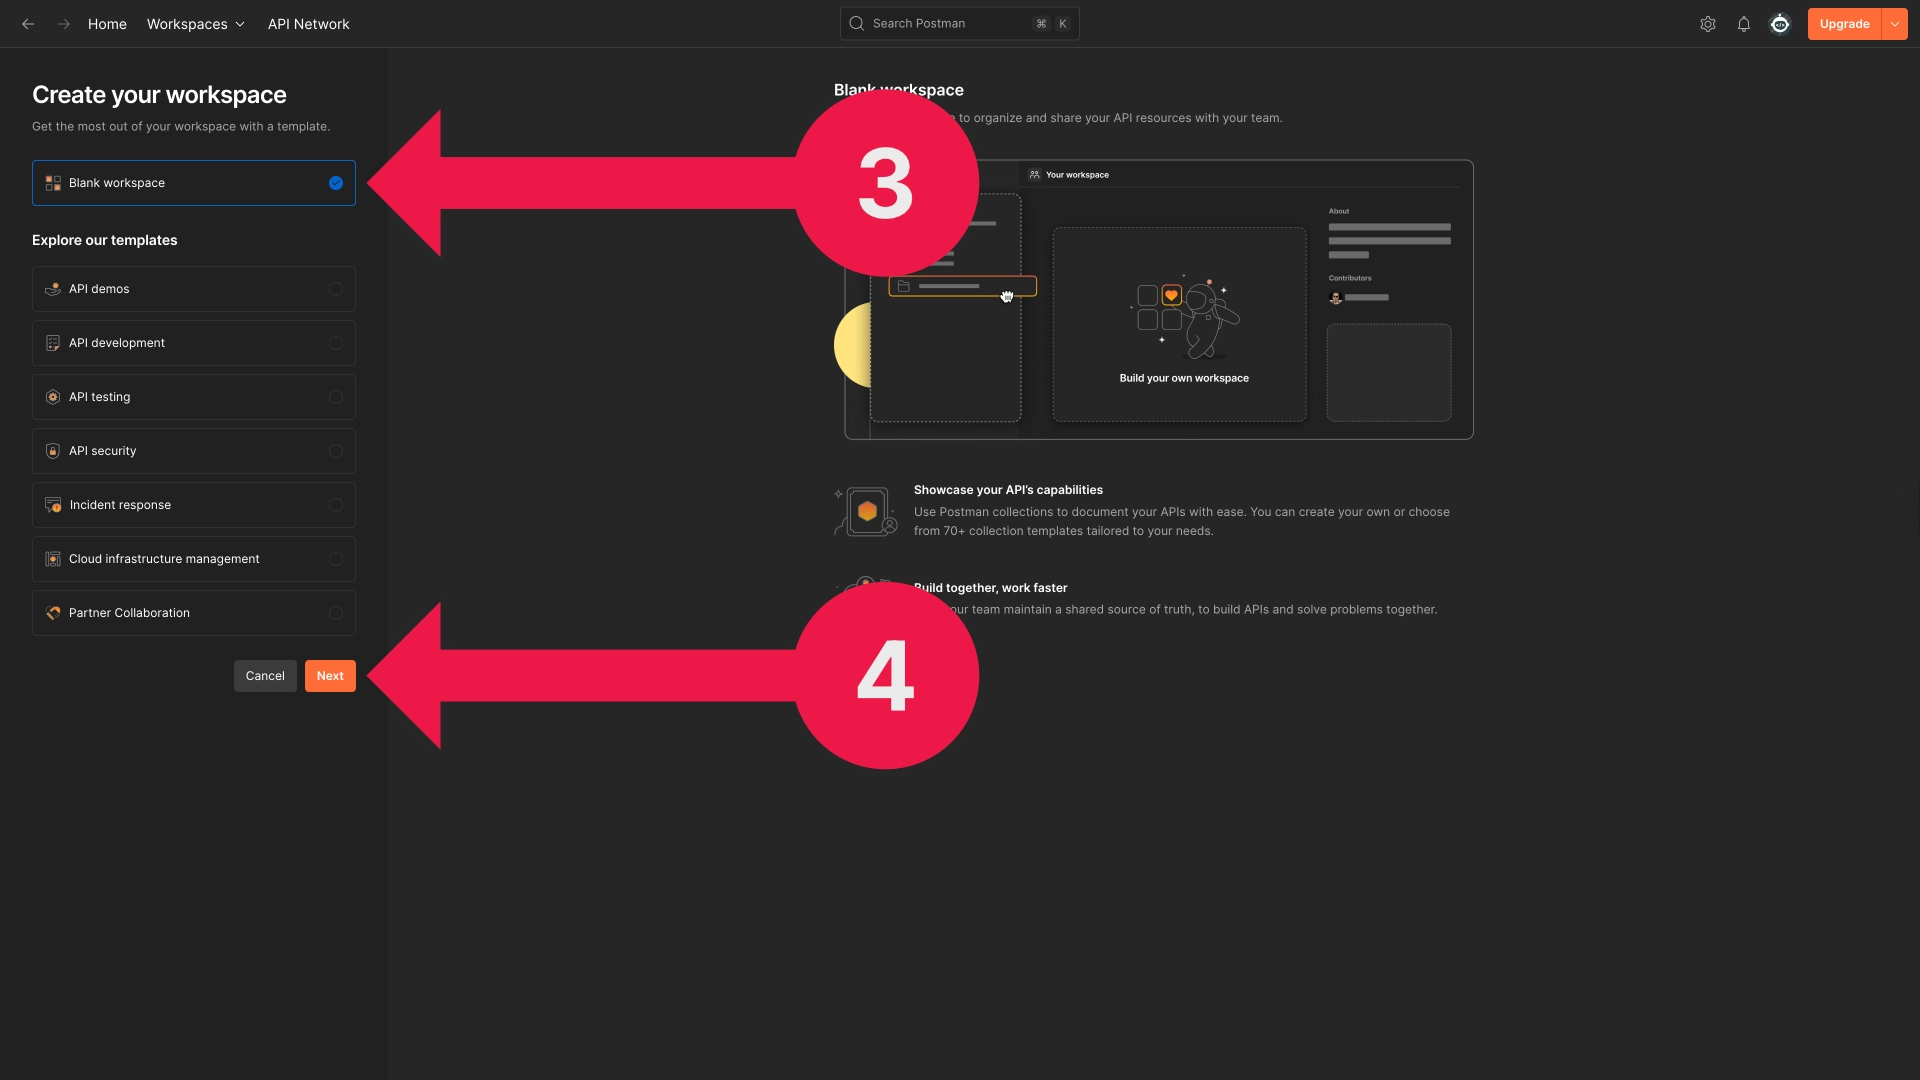
- Select Blank workspace and click Next.
- Name your workspace something like Blackboard APIs, then click Create.

-
Once in your new workspace:
- Click File > Import… (or press
Command + O) - Locate and select the
learn-swagger.jsonfile you downloaded - Make sure Postman Collection is selected as the import type
- Click Import
- Click File > Import… (or press
You should now see the Learn API endpoints available in the Collections tab.
🔐 Step 3: Set Up the Authentication Environment
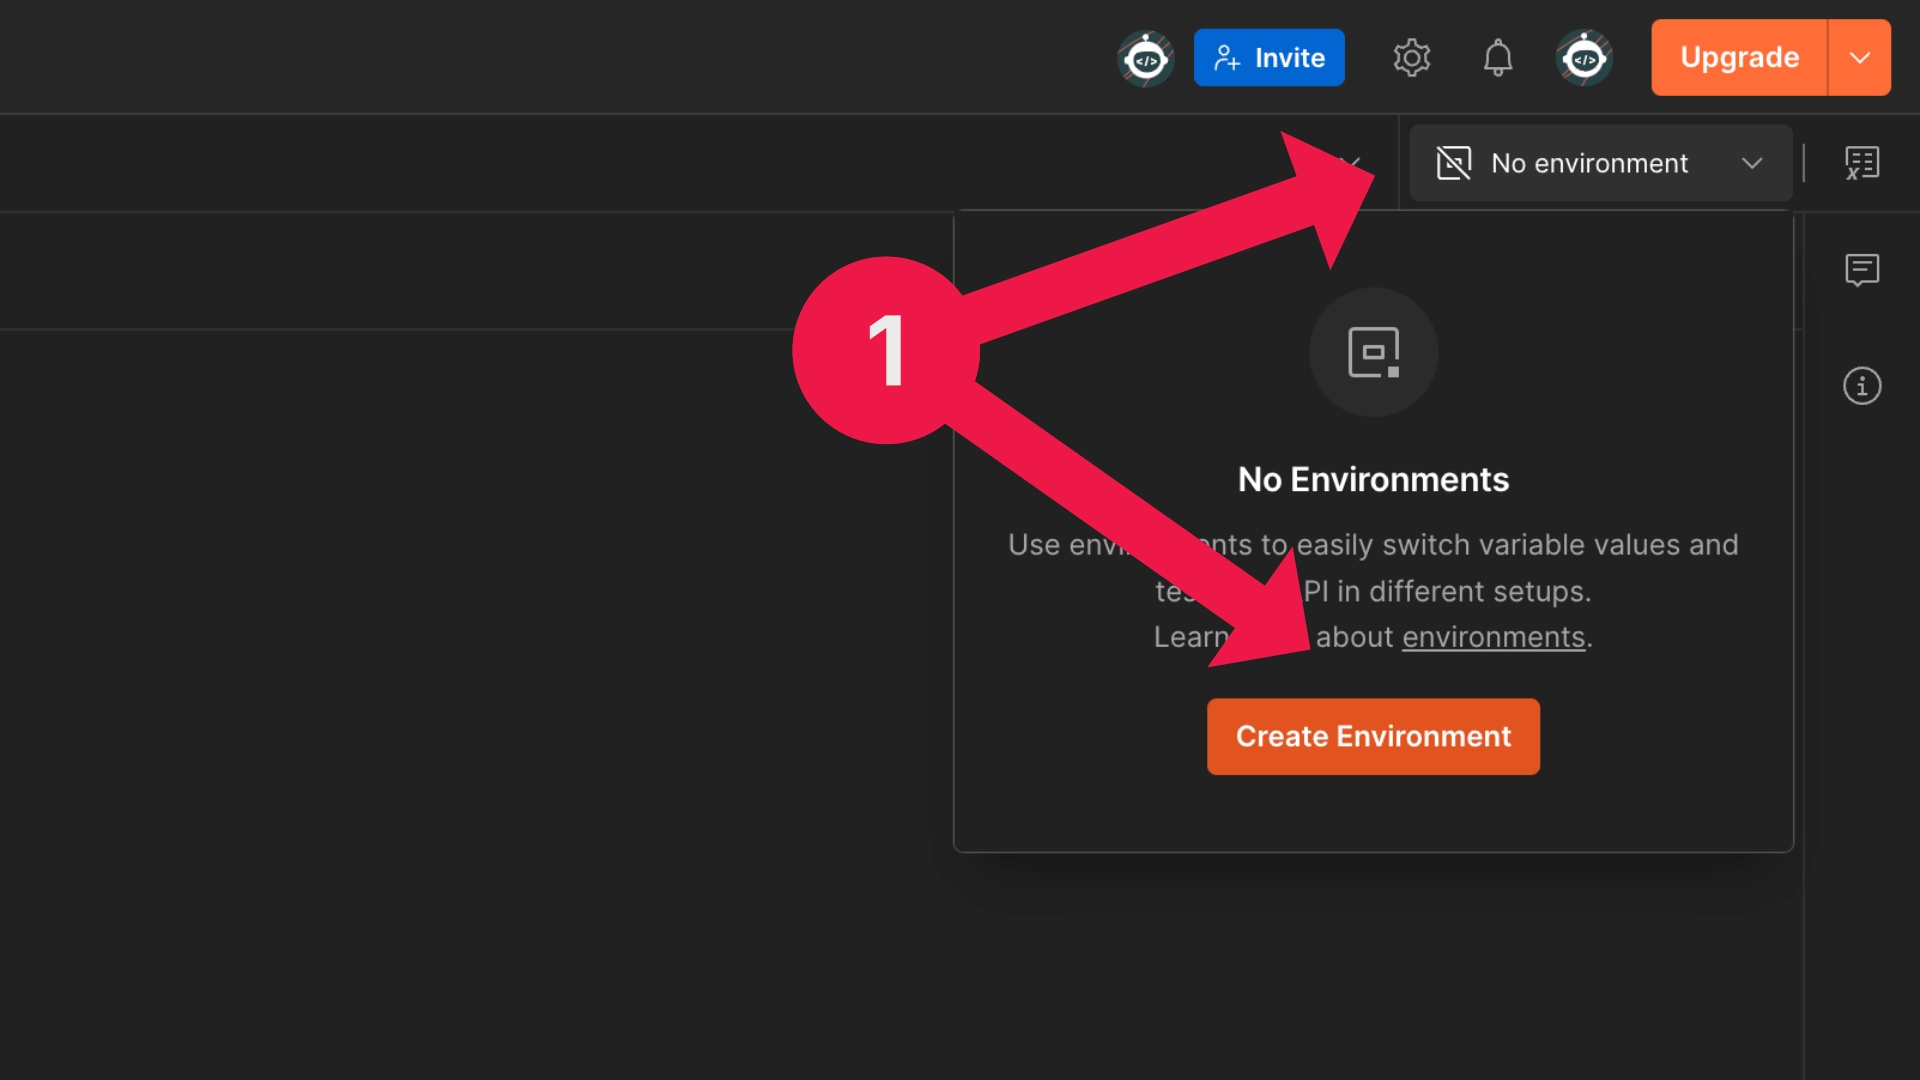
- In Postman, click Environments (top-right) > Create Environment.
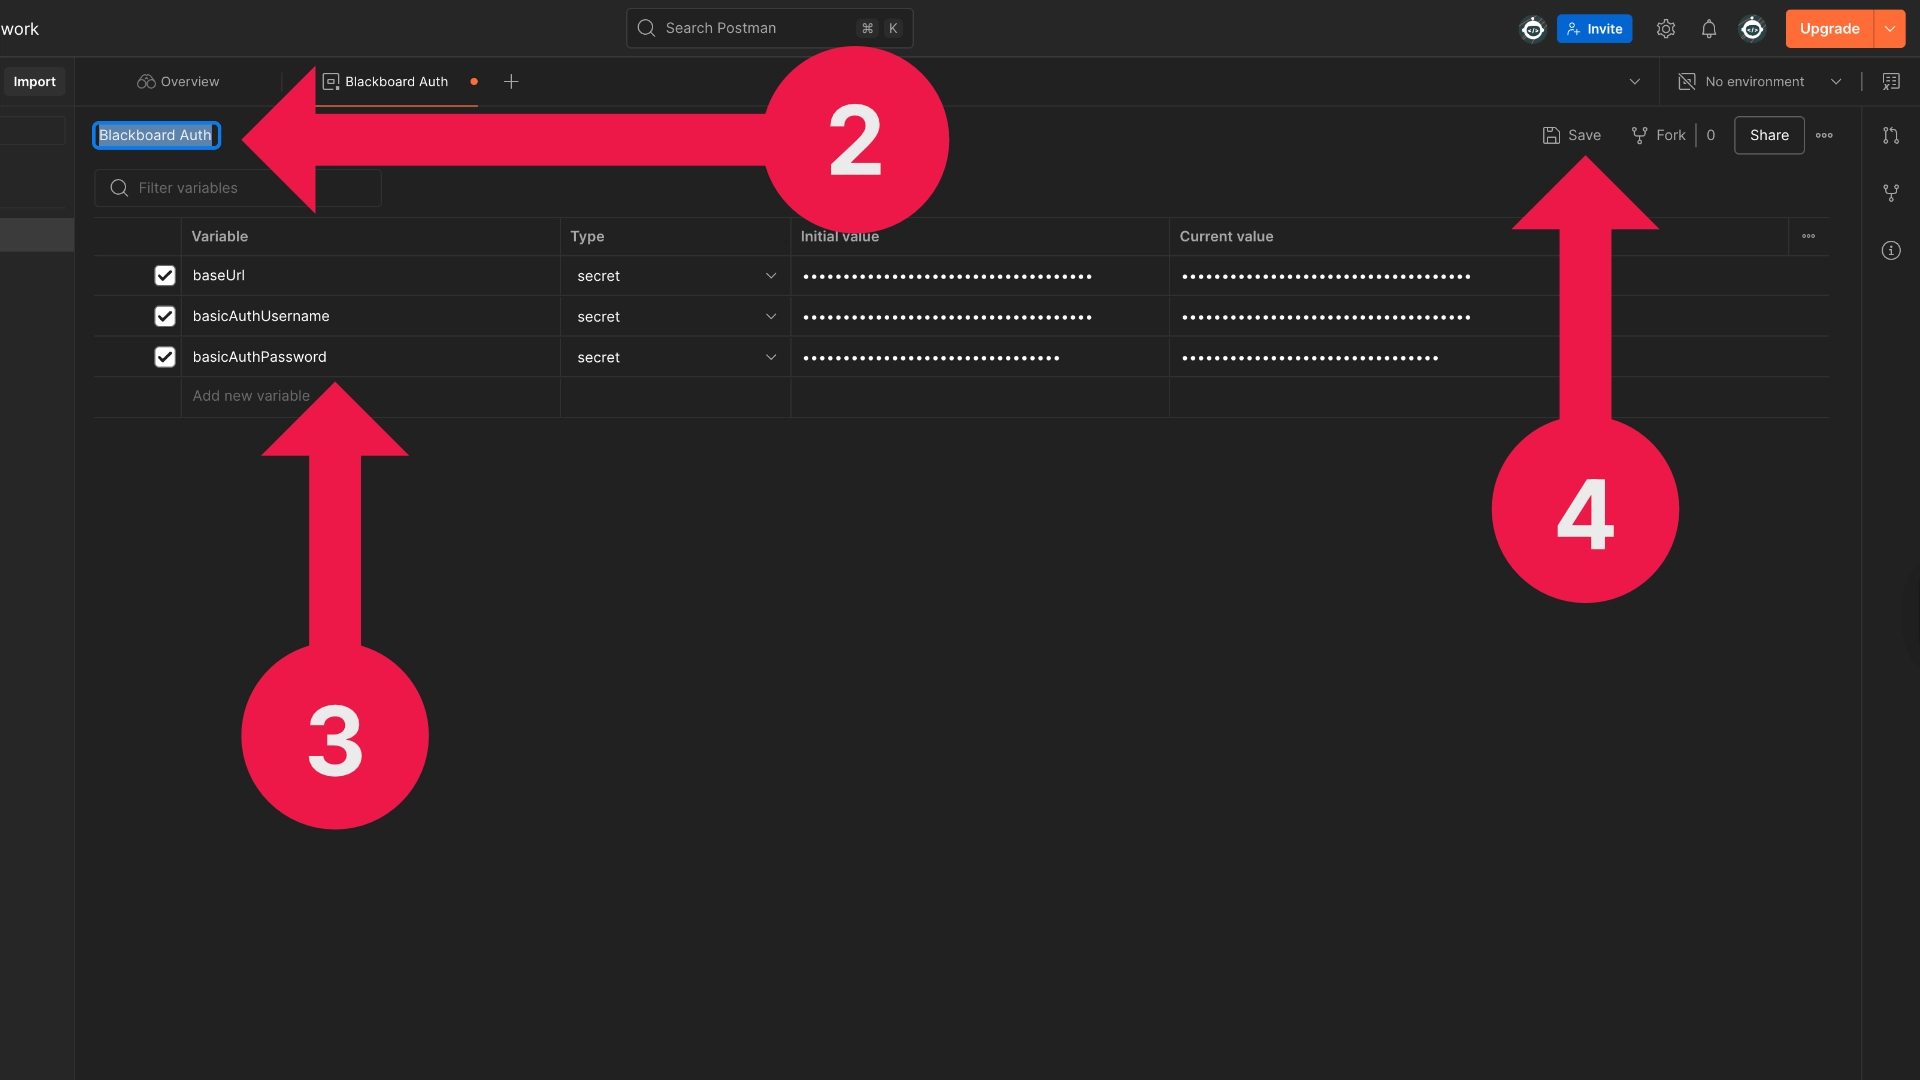
-
Name the environment something like Blackboard Auth.
-
Add the following variables:
- baseUrl
- Initial Value: (Provided by Anthology)
- Type:
Default
- basicAuthUsername
- Initial Value: (From Developer Portal)
- Type:
Secret
- basicAuthPassword
- Initial Value: (From Developer Portal)
- Type:
Secret
- baseUrl
These values are provided when you register your application in the Anthology Developer Portal. You’ll use the
client IDas your username and theclient secretas your password.
- Click Save (or press
Command + S).
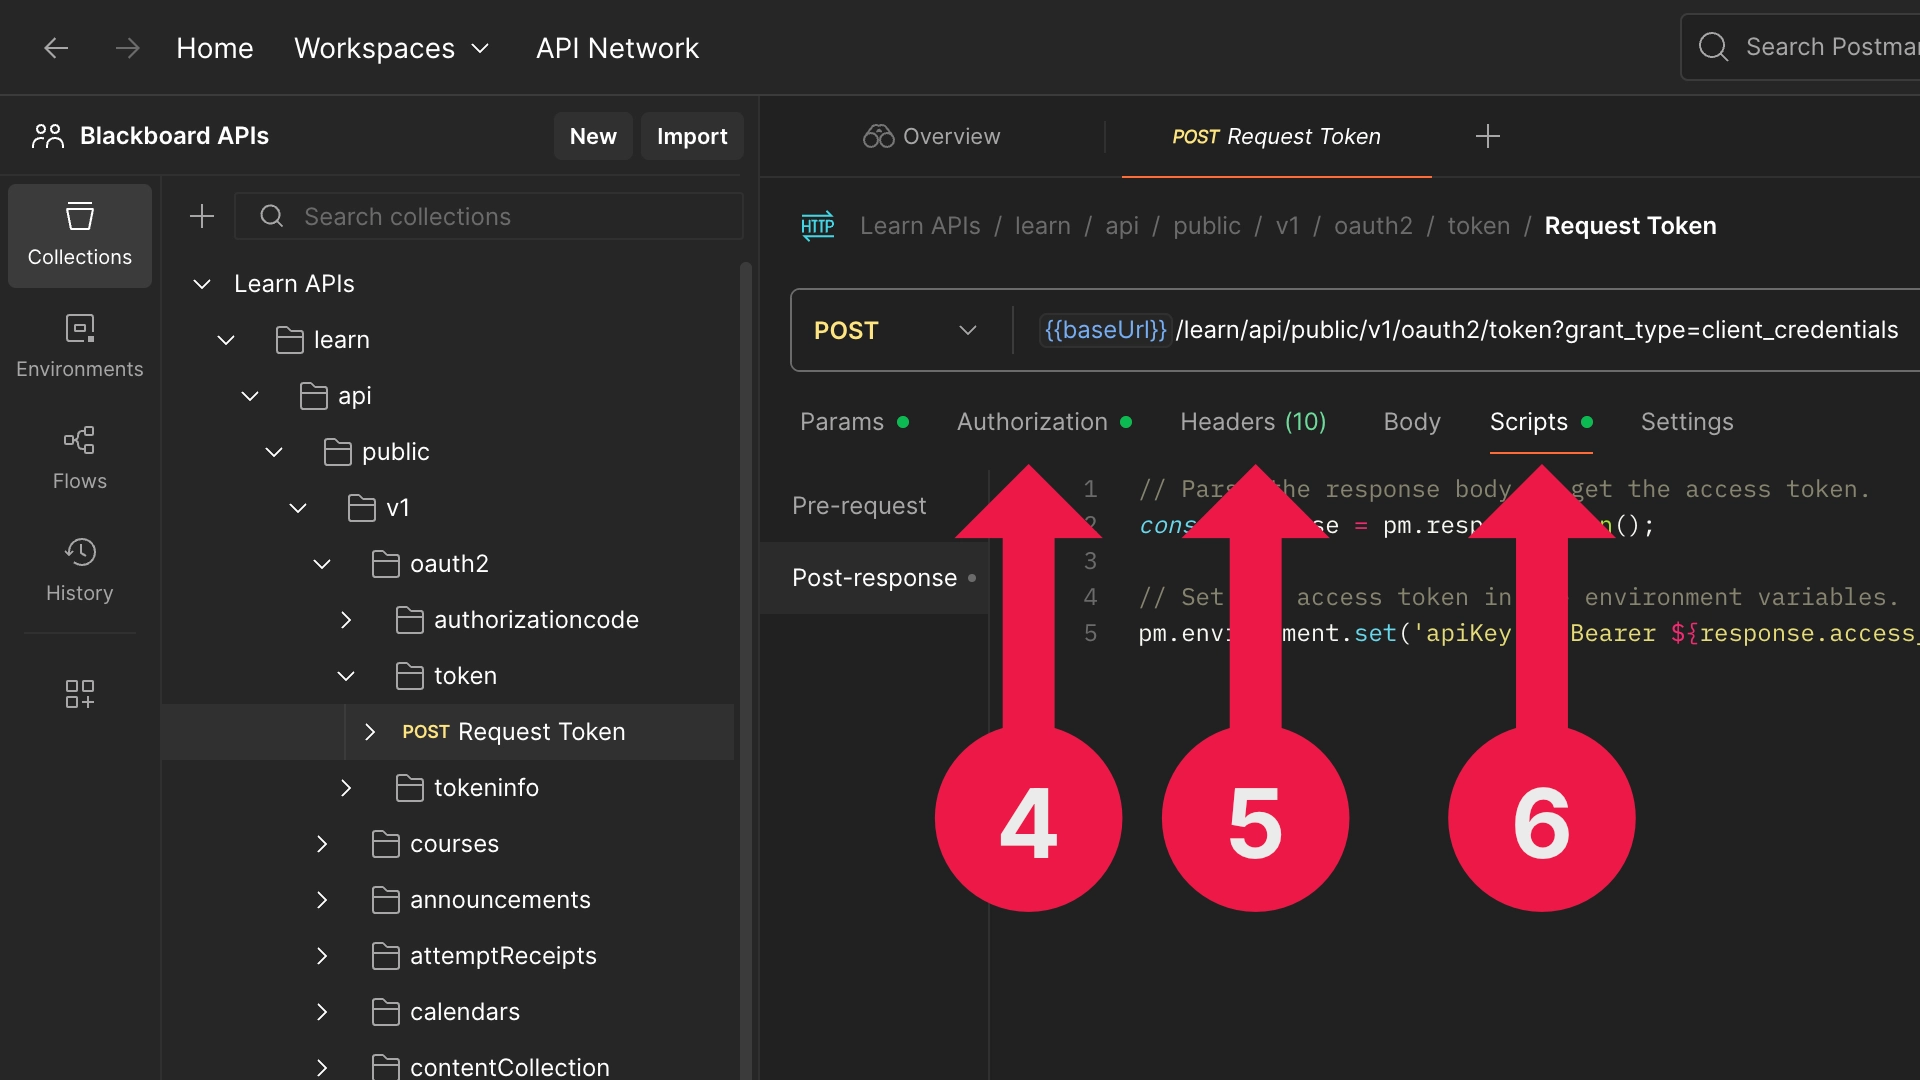
🔑 Step 4: Request an Access Token
To interact with Blackboard's REST API, you’ll need to obtain an OAuth2 access token. This token authenticates your API calls and is required for most requests.

-
Make sure Blackboard Auth is selected in the environment dropdown (top-right).
-
In the Collections tab, go to:
Learn APIs > learn > api > public > v1 > oauth2 > token > Request Token -
Select the Params tab:
- Deselect all parameters except for
grant_type - Set
grant_typetoclient_credentials
- Deselect all parameters except for
-
Go to the Authorization tab:
- Type: Basic Auth
- Username:
{{basicAuthUsername}} - Password:
{{basicAuthPassword}}
-
Go to the Headers tab and change the existing header to:
- Key:
Content-Type - Value:
application/x-www-form-urlencoded
- Key:
-
Go to the Scripts tab (may be labelled "Tests" or "Post-response"):
- Paste the following script:
// Parse the response body to get the access token. const response = pm.response.json(); // Set the access token in the environment variables. pm.environment.set('apiKey', `Bearer ${response.access_token}`); -
Click Send (or press
Command + Enter) to retrieve your access token.
🌐 Step 5: Add the Access Token to All API Requests
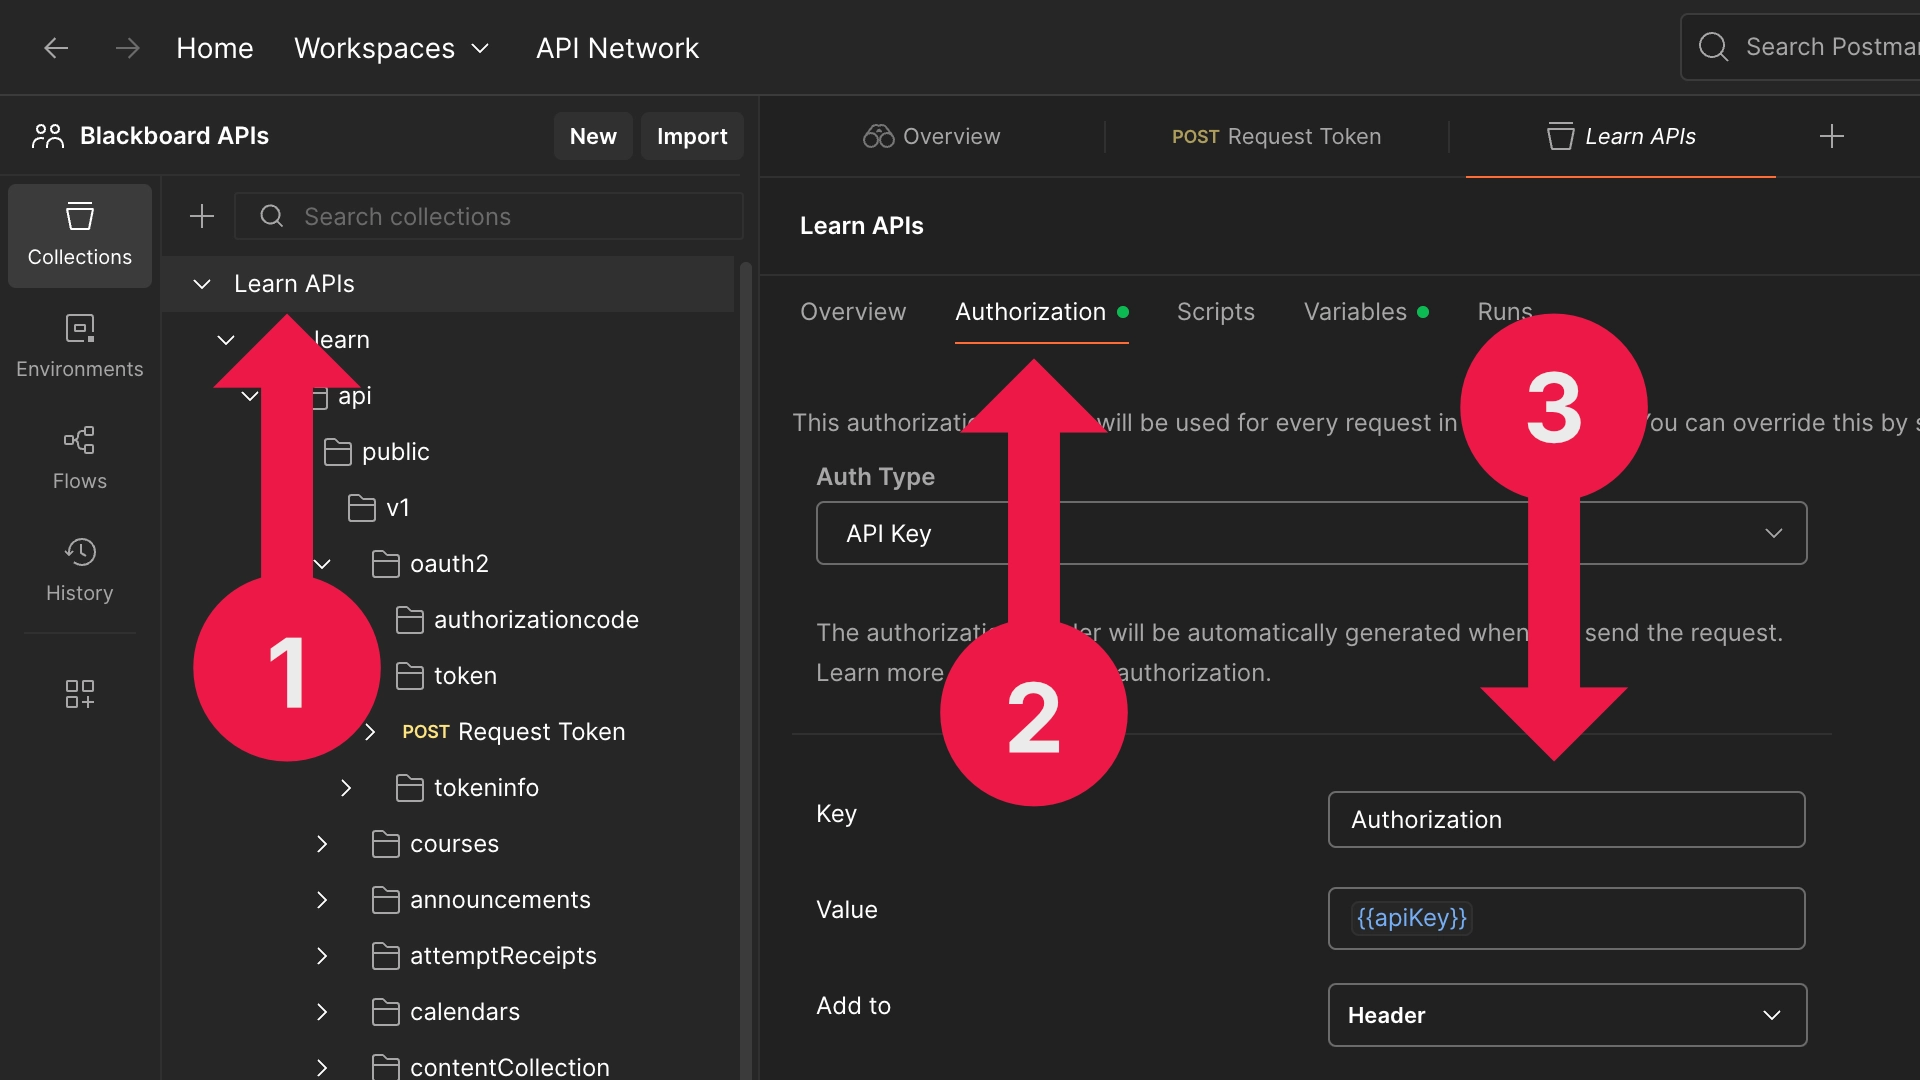
- In the Collections tab, click on Learn APIs (at the top level).
- Select the Authorization tab.
- Change the following settings:
- Auth Type:
API Key - Key:
Authorization - Value:
{{apiKey}} - Add to:
Header
- Auth Type:
- Click Save (or press
Command + S).
All requests in the collection will now use your access token automatically.
💡 Tip: Some individual requests may still have old parameters set by default. If you get errors, check the Params tab and uncheck or delete any unnecessary ones.
You're now ready to explore Blackboard's Learn API.
✅ Step 6: Make a Simple API Call
Let’s test the setup with a basic GET request to list users.
- In the Collections tab, navigate to:
Learn APIs > learn > api > public > v1 > users > Get Users - Click on the request and make sure:
- The Authorization is inherited from the collection
- There are no unnecessary parameters selected
- Click Send.
You should receive a JSON response containing user records.
If you receive a 401 error, double-check that your access token has been saved and that it's correctly set under the collection’s Authorization tab.
🧯 Troubleshooting
Here are some common issues and how to fix them:
-
401 Unauthorized:
- Check your
client_credentials(client ID and secret) - Make sure the token request succeeded
- Confirm the token is included in the header (check the "Authorization" tab is set to "Bearer Token" and using the correct variable)
- Check your
-
400 Bad Request:
-
This often happens if unused parameters are still selected in the request.
-
For example, when testing
GET /users, if parameters likedataSourceIdare left checked and contain placeholder or junk values, Blackboard will reject the request with a400error and a verbose message like:{ "status": 400, "message": ": 1 errors\nField error in object 'usersSearchCriteriaPubV1' on field 'dataSourceId': rejected value [anim nostrud occaecat elit amet]; ...", "extraInfo": "..." } -
Solution: go to the Params tab and deselect or delete any unnecessary parameters before sending the request.
-
-
Empty or unexpected responses:
- Your Learn environment may not contain any users or courses yet.
- Try calling a different endpoint or inspecting the full JSON response for pagination info.
-
Token not saving or reused:
- Ensure your token save script (under the Tests tab) is error-free and includes the
Bearerprefix. - Check your Collection-level Authorization settings are set to inherit the token from the environment variable (for example,
{{token}}).
- Ensure your token save script (under the Tests tab) is error-free and includes the
🎉 Summary
You've now:
- Imported Blackboard’s Learn API (Swagger file) into Postman
- Set up a Postman environment for OAuth2 authentication
- Retrieved an access token using the
client_credentialsgrant type - Configured all API requests to use your token automatically
- Made your first successful API request
From here, you can explore other endpoints to manage users, courses, announcements, enrolments, and more. If you’re working in an institutional context, be sure to follow data protection policies when experimenting with real user data.
Happy exploring!
— Karl